How to Get Rid of Razor Bumps Fast (16 Proven Ways)
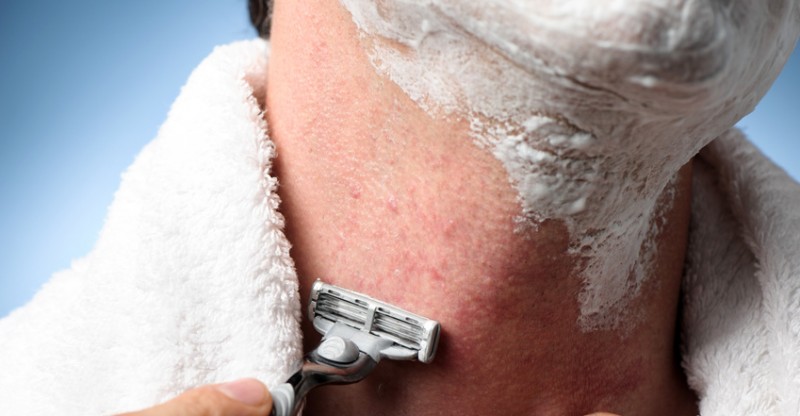
Are you suffering from razor burns? Are you seeing red bumps after shaving?
Are you in pain and experiencing discomfort?
We’ve all been in a bad shaving situation. For instance, maybe you’re short on shaving cream.
And with only a few minutes to spare, you run your razor across your stubble.
You wash, dry, and go. But then you notice your skin quickly becomes red and inflamed.
Minutes later, you notice a red rash or small red bumps popping up on your skin where you shaved.
You’ve got a classic case of razor burn. This skin condition can occur regardless of the products you used (or didn’t use).
It can occur whether or not you usually have sensitive skin. It can happen to anyone.
If you’re ready to learn how to get rid of a razor burn and end the discomfort and unsightliness of irritated skin, then read on.
You’ll find our Top 16 easy, effective ways for preventing razor bumps.
Learn how to heal aggravated skin in just minutes, and literally put your best face forward!
This guide will teach you the healthy antidotes to the burns and bumps associated with shaving.
And it’ll suggest some easy, preventative steps you can take during your daily or weekly shaving routine.
They’ll help your skin stay as healthy as possible.
After learning these 16 pro tips for how to prevent razor bumps, you’ll always have an easy remedy in your toolbox.
And if one remedy doesn’t work for you at first, there are many more remedies to try along the path to clear, pain-free skin.
Let’s get started with the healing process!
Baby Powder
After you shave, try patting a little baby powder onto the areas where you tend to break out into rashes.
Just make sure you aren’t allergic to powders before you begin this treatment.
Baby powder started off as a way to mitigate diaper rash, and it similarly works on adult skin.
Plus, if you’re specifically looking for ways to get rid of ingrown hair, baby powder will be your best friend.
To let it soak in before beginning your shaving routine, wait a few minutes after you pat on the baby powder.
You also can treat current razor burn by using baby powder on the affected areas after you shower.
Coconut Oil
Coconut oil has long been an antidote for dry, cracked skin.
And now it’s an effective remedy for getting rid of razor bumps — by coating and nourishing your skin with its healing ingredients.
Before and after shaving, use a cotton ball to lightly apply coconut oil to the areas where you have sensitive skin.
Keep in mind that coconut oil is a solid. But when it comes into contact with your warm hands, it’ll quickly turn into a liquid.
Therefore, it’s usually a good idea to apply this oil while you’re still in the shower or standing on a bathmat.
It’s an effective remedy for getting rid of a razor burn, but it’s messy.
Tea Tree Oil
If you want to quickly and organically learn how to get rid of a razor burn, you can purchase a small bottle of organic tea tree oil from your local health food store.
To create a rich salve for sensitive skin with your favorite organic lotion, it only takes a drop or two.
Free your skin from razor burn through these quick steps:
- Drop a few droplets into your favorite cream.
- Apply the oil-infused cream to the affected area.
- Gently rub it in just after you’ve finished shaving.
Witch Hazel
Often referred to in old wives’ tales, witch hazel is a traditional, natural oil that acts as a moisturizer for dry skin.
In addition, its cooling properties make it a great agent for irritated skin.
And it’s a relieving tool that’ll help ease the pain associated with razor burn.
Getting started is easy:
- Purchase a bottle of witch hazel from your local health food store or drugstore.
- As a preventative measure against razor burns and bumps, slather some it on your skin once a week with a cotton ball.
- Before getting dressed, allow the witch hazel to soak into your skin.
Strawberry Paste
If your lifestyle involves homemade options, then you can make a paste from fruits you may already have at home, and mix it with your favorite organic cream.
This recipe involves strawberries, which have antioxidant properties.
To make your strawberry paste:
- Wash a handful of ripe strawberries.
- Place the washed berries in a bowl.
- Gently mash them with the back of a spoon, until the strawberry paste has a consistency that’s firm yet thoroughly crushed.
- Directly apply the paste to your red areas.
- Leave it on for 15-20 minutes, then wash it off.
- To make it easier to apply, you should also add some of your favorite organic cream to the strawberry paste. The cream will soak into your skin, and you can gently wash away the strawberry residue.
Homemade Sugar Scrub
In a bowl, combine two tablespoons of coconut oil with two tablespoons of table sugar and one tablespoon of pure nectar.
Gently mix them until all the ingredients are blended. Then apply it to areas where you’re prone to outbreaks of razor bumps.
Allow the sugar scrub to sit for about 5 to 10 minutes. Then jump in the shower to gently wash it away.
This scrub acts as a natural exfoliant for your skin. Keep in mind that you shouldn’t use it if your skin is already irritated.
A sugar scrub is going to help prepare skin (that isn’t irritated) for the future friction of having a razor against your skin.
It’s a preparatory step that works over time and builds up your skin’s strength.
Essential Oils
There are several essential oils that have healing and anti-inflammatory properties.
So they’re excellent antidotes to redness and irritation, and the perfect remedy for getting rid of razor bumps.
The essential oils you can use to get rid of razor bumps are calendula key, chamomile, and lavender.
Put a few droplets into a bathtub full of water, and soak for about 15 minutes. Keep in mind that you shouldn’t directly apply essential oils to your skin.
They’re meant to be diluted. You can also add one small droplet of these oils to your favorite organic cream.
Therefore, this fragrant, healthy cream will work toward moisturizing, calming, and healing your irritated skin.
Use it before and after you shave.
Baking Soda Paste
If you’re looking for an effective way to get rid of razor bumps, you can use materials that you already have in your kitchen.
Then it’ll be easy to make this baking soda paste.
Add a tablespoon of baking soda to a mug of water, and mix it until the baking soda dissolves.
From there, dip a cotton ball into the solution. Then douse your irritated skin with the solution by dabbing it on.
Allow the solution to dry on your bumps. Then wash it away with cool water.
Until the redness dies down, you might want to try this remedy several times a week.
For extremely sensitive or irritated skin, you can also make the paste thicker, and directly apply it on the reddened area.
Cold Compress
Cooling a red, irritated area is an easy, cost-efficient way to get relief from razor burn and reduce inflammation and swelling.
To make your cold compress, fill a Ziploc bag with ice, and tape a washcloth or hand towel around the bag.
Then place the cold compress on the area that’s red and hurting.
You’ll shock the blood vessels and temporarily relieve the burning sensation.
But don’t leave a cool compress on your skin for more than 10-15 minutes at a time.
It’s normal for your skin to feel tingly from the cold compress, but you’ll want to remove the compress when your skin becomes so cold that it starts hurting you.
The point of a cold compress is to temporarily relieve the burning sensation, but you don’t want to cause your skin further pain by leaving the ice compress on for too long.
And never apply ice directly to your skin. Rather, let the plastic bag and towel serve as a barrier between you and the ice.
Honey and Apple Cider Vinegar
Honey acts a natural salve, and it’s known for its antibacterial properties.
Apple cider vinegar has calming properties. Together, they act as a two-step remedy that packs a punch against razor burn.
However, if you use this remedy, remember that it’s going to be a little messy.
So you might want to do it while you’re sitting in the bathtub.
You can directly apply the honey on the inflamed area, and allow it to sit for about five minutes.
Then jump in the shower and wash it off with cool water.
Pat your skin dry. Then dab it with apple cider vinegar, which has real fruit extract in it.
Allow it to dry. Repeat as necessary throughout the week, until the redness and bumps go away.
Aspirin Solution
Originally developed by the pharmaceutical company Bayer, aspirin has the ability to target pain and inflammation in the body.
You can also use it to combat the swelling and redness associated with razor burns.
To get started, put a teaspoon of warm water in a cup, and drop in two aspirins. Allow the tablets to fully dissolve, and mix in the solution.
Then allow the solution to sit until it begins to solidify into a glue-like substance.
Spread the glue onto the reddened area, and allow it to sit for about 10 minutes. Wash away with warm water, and pat dry.
Aloe Vera
There’s a reason why you should keep an aloe vera plant in the kitchen – any red, burning sensation your skin is feeling on the outer layer of skin can be soothed with natural aloe vera.
To accomplish this goal, simply break off an arm of the aloe vera plant, squeeze the oil from the cutting, and spread it onto your affected area.
Immediately, your skin will begin to feel cool and calm.
Allow the aloe vera to sit on your skin and soak in a little.
It’ll begin to feel sticky as it soaks. Then after about 15 minutes, wash it off with warm water.
Cucumber Compress
Cucumbers are rich in vitamins C and K — both of which are critical for soothing and healing the skin.
You can make your own cucumber compress by simply washing a fresh, ripe cucumber and slicing it into thin chips.
Spread the cucumber chips across the inflamed part of your skin, and leave it on for about 20 minutes before you remove it.
You can also easily make a paste by using cucumbers and milk (as long as you’re not allergic to dairy).
Start by blending a small cucumber with 1/3 cup of milk.
Pour the paste into a bowl, and allow it to chill in your refrigerator (until it starts forming a more solid, lotion-like consistency).
Spread it on your irritated skin, and allow the mixture to soak in for about 10 minutes. Then wash it off with warm water.
Rubbing Alcohol
If you find that you frequently develop razor burns and bumps, you might also need to take a few preventative measures that’ll protect your skin from the razor itself.
For example, after you shave, microbes can get lodged in the blades of your razor.
And if left there for the next shave, they can cause irritation, and the razor will be unevenly applied to your skin.
To prevent these outcomes and properly clean your razor every time, wash it in a shallow dish of rubbing alcohol by swirling it for a few seconds.
Then let it dry. This easy, effective way of sanitizing your razor will ensure that you get the cleanest, closest shave possible.
In addition, remember to regularly change your razor blades.
When a razor gets dull, it can uncomfortably rub against your skin and create rashes and bumps.
Don’t Shave Every Day
If your skin is especially prone to razor burns and an outbreak of red bumps, then you’ll only aggravate your skin more if you shave every day.
Instead, give your skin a little breathing room.
In certain situations, you may find that this tip is difficult to achieve.
For instance, maybe you like to frequently shave your legs, or your workplace doesn’t allow facial hair.
But by waiting 2-3 days (depending on your skin’s healing time), you give your sensitive areas time to sufficiently heal.
If razors continue causing you problems, you may also want to try alternative methods for removing hair.
For example, you might try waxing or an electric razor.
The latter offers more of a cushion between your skin and the razor, which leads to less irritation.
To calm your sensitive areas, always moisturize after you shave so that your skin remains healthy and supple.
You want to do everything you can to prevent your skin from getting dried out and irritated, as it’ll continue healing between shavings.
Take a Warm Bath
Unfortunately, if you’re looking for a way to get rid of ingrown pubic hair, there isn’t a quick remedy.
But over time, what’s effective and soothing for the pubic region is regularly taking a warm bath.
Then you can give the hair follicles time to open up, soften, and release hair that’s grown inward.
Maybe the area hasn’t become infected by an ingrown hair, and you haven’t been able to soften it with warm baths.
If so, you could carefully remove the ingrown hair with a pair of tweezers.
You’ll want to gently pull the hair out. To help ensure the area isn’t further irritated, don’t use any jerking movements.
Ingrown hairs can get so inflamed that they become infected.
If you begin to see pus in the area, then you’ll want to continue taking warm baths, applying a warm compress and visiting your doctor.
Conclusion
At the end of the day, razor burns, bumps, and redness associated with shaving can be painful and annoying.
But you’ll have to accept and confront these problems if you’re going to continue shaving.
Unless you want to commit to growing out your hair on all parts of your body, then you’re going to have to find effective ways to shave and protect your skin from irritation.
But that doesn’t mean you’ll always need to use a razor. There are alternative methods (including using electric razors and getting your hair waxed).
Over time, you’ll find the method that works best for you and your skin.
Razor bumps are a common problem throughout the world (for both men and women), but everyone can learn how to quickly get rid of them.
They may occur due to the shaving cream, oils, and soaps you’re using, or because of the interaction of the razor blade with the person’s skin.
Regardless of how you get razor burn, it’s painful and unattractive, and it can result in lower self-confidence.
But with this guide of easy, effective, quick tips, you can get rid of razor bumps and prevent them from happening in the first place.
Then you’ll be on your way to having clear, fresh skin after you shave.
FDA Compliance
The information on this website has not been evaluated by the Food & Drug Administration or any other medical body. We do not aim to diagnose, treat, cure or prevent any illness or disease. Information is shared for educational purposes only. You must consult your doctor before acting on any content on this website, especially if you are pregnant, nursing, taking medication, or have a medical condition.
HOW WOULD YOU RATE THIS ARTICLE?


